This (2022-23) was the year of the lab practical in my classroom. Fresh off the winter term practicals success, this spring students demonstrated what they knew about two units: Work & Energy as well as Electric Charge & Circuits. In this post, I explain how I designed the Electricity practical which was highly successful.
I owe a debt of gratitude to Kelly O’Shea and her Circuits and Charges: A Physics Active Exam post.
Electric Charge & Circuits has three parts: Forces Due to Charges in a Plane, Mystery Box, and Building Circuits. The Mystery Box was the most involved part for me to create, so this post focuses on it.
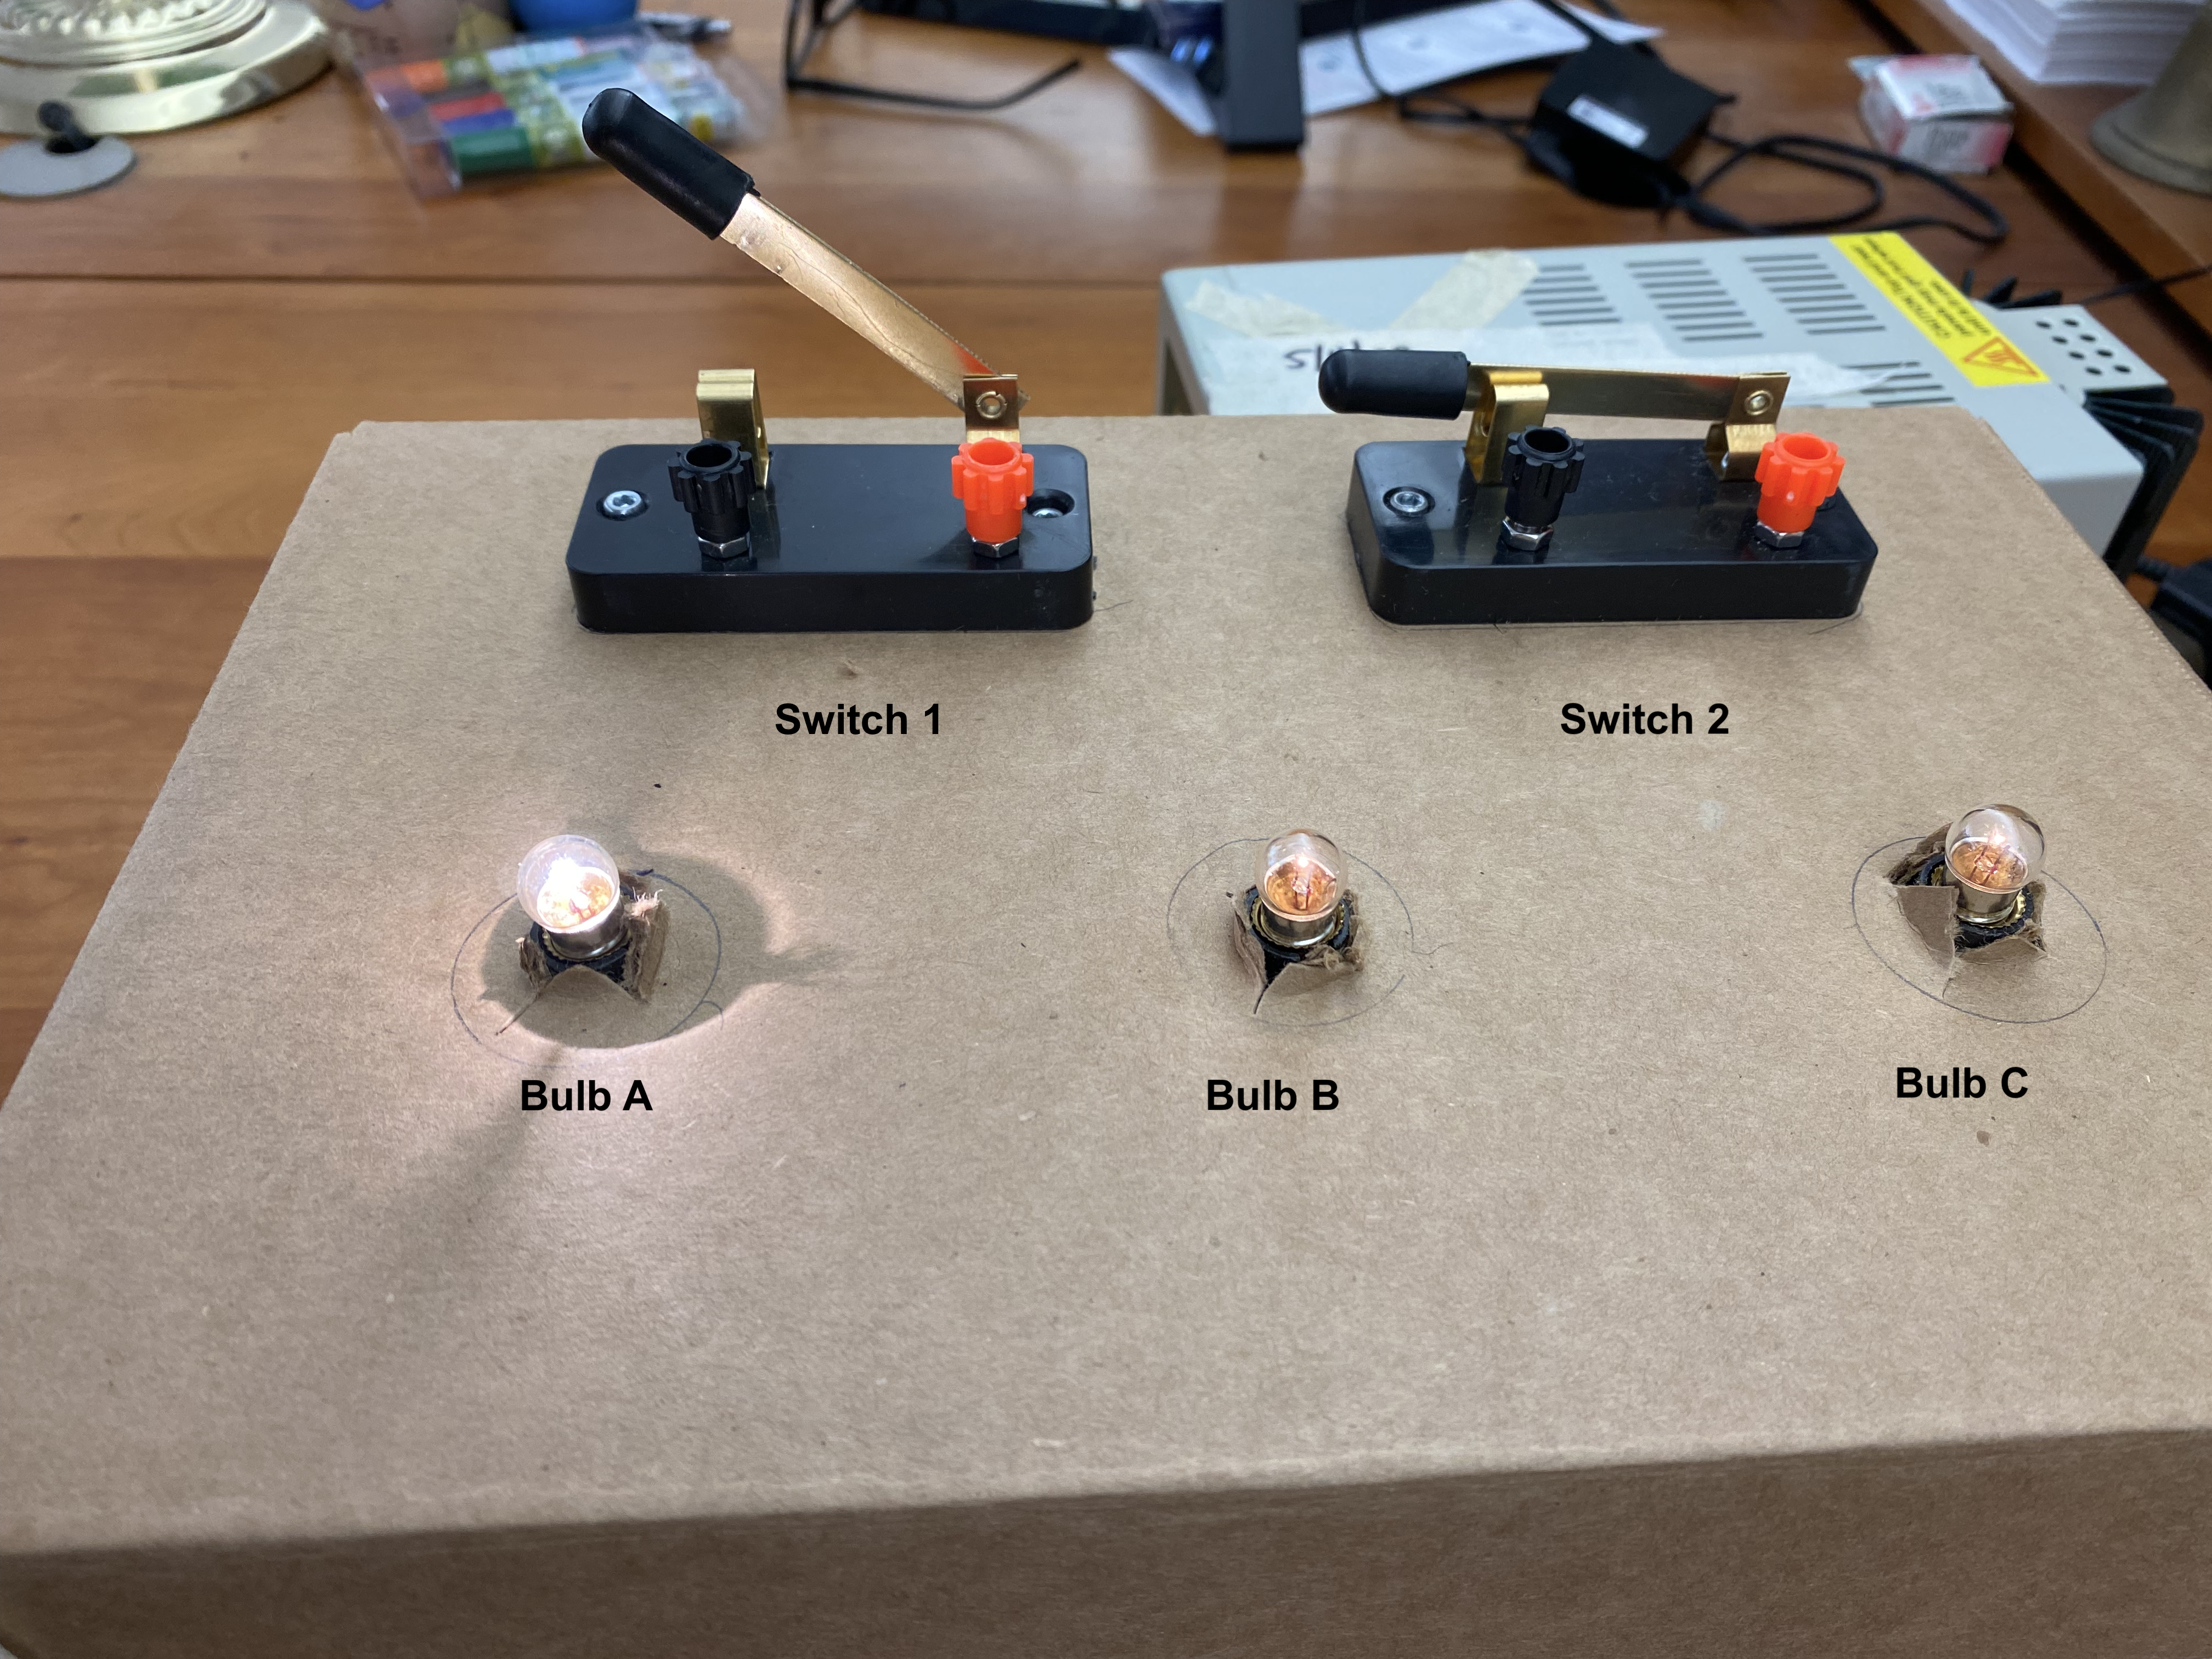
Student Mode of the Mystery Box
This puzzle was a popular and challenging part of the practical. To give a taste of how it worked, here’s a minute or so of me interacting with the box.
Design Principles
Now that you’ve seen one part of the practical, let’s back up and look at how I write them, especially the sort that stand as term-end assessments. I try to keep these five Design Principles in mind:
- Use the modeling framework students worked on all year. Scientific models have four components: visual, verbal, graphical, and mathematical.
- Build on recent lab experiences. For electric circuits, that included building circuits using bulbs and adjustable DC power supplies. Students had worked through much of the Modeling Instruction materials for circuits, which focuses on bulb brightness as an indicator of current.
- Feel like a puzzle. Know how a puzzle grabs your attention and begs you to solve it? Yeah, that feeling. I decided that good puzzles and practicals a) have a good hook and b) have a low floor and high ceiling.
- Consist of multiple tasks that vary in style so that students can share lab equipment by rotating through stations.
- Be relatively easy to grade. Turnaround time at the end of the term is tight and my energy level is low.
Assignment & Environment
Get the Lab Practical: Electric Charge & Circuits for your remixing and reusing pleasure.
Authorship notes: I did not write Charges in a Plane, it comes from E&M TIPERS; Mystery Circuit Box is basically a copy of Kelly O’Shea’s Puzzle Box; and Building Circuits is adapted from Kelly’s activity of the same name.
I gave students three 90 minute periods plus up to three hours of optional out-of-class lab time to complete this and another practical on Work & Energy. No homework was assigned these days. Students had adequate time to finish with the built-in catch up day and open lab times. Actual completion time for Electric Charge & Circuits varied wildly, averaging about 2 hours with a minimum of 90 minutes and a maximum of 3 hours. The only students who struggled were 1) those with executive function challenges and 2) those who didn’t understand the content. For type 1, next year’s version of me will pay closer attention to completion progress for the 10% or so of my students who need it. For type 2, next year me will provide lower floors on all portions of the practical (the Coulomb’s Law ranking task was particularly sticky).
Students worked alone and rotated through the stations. On days 1 and 2, I managed the flow, on day 3, students managed themselves.
To encourage integrity, I didn’t let the lab packets out of the room and there were several versions of key parts of the practical.
Construction of the Mystery Box
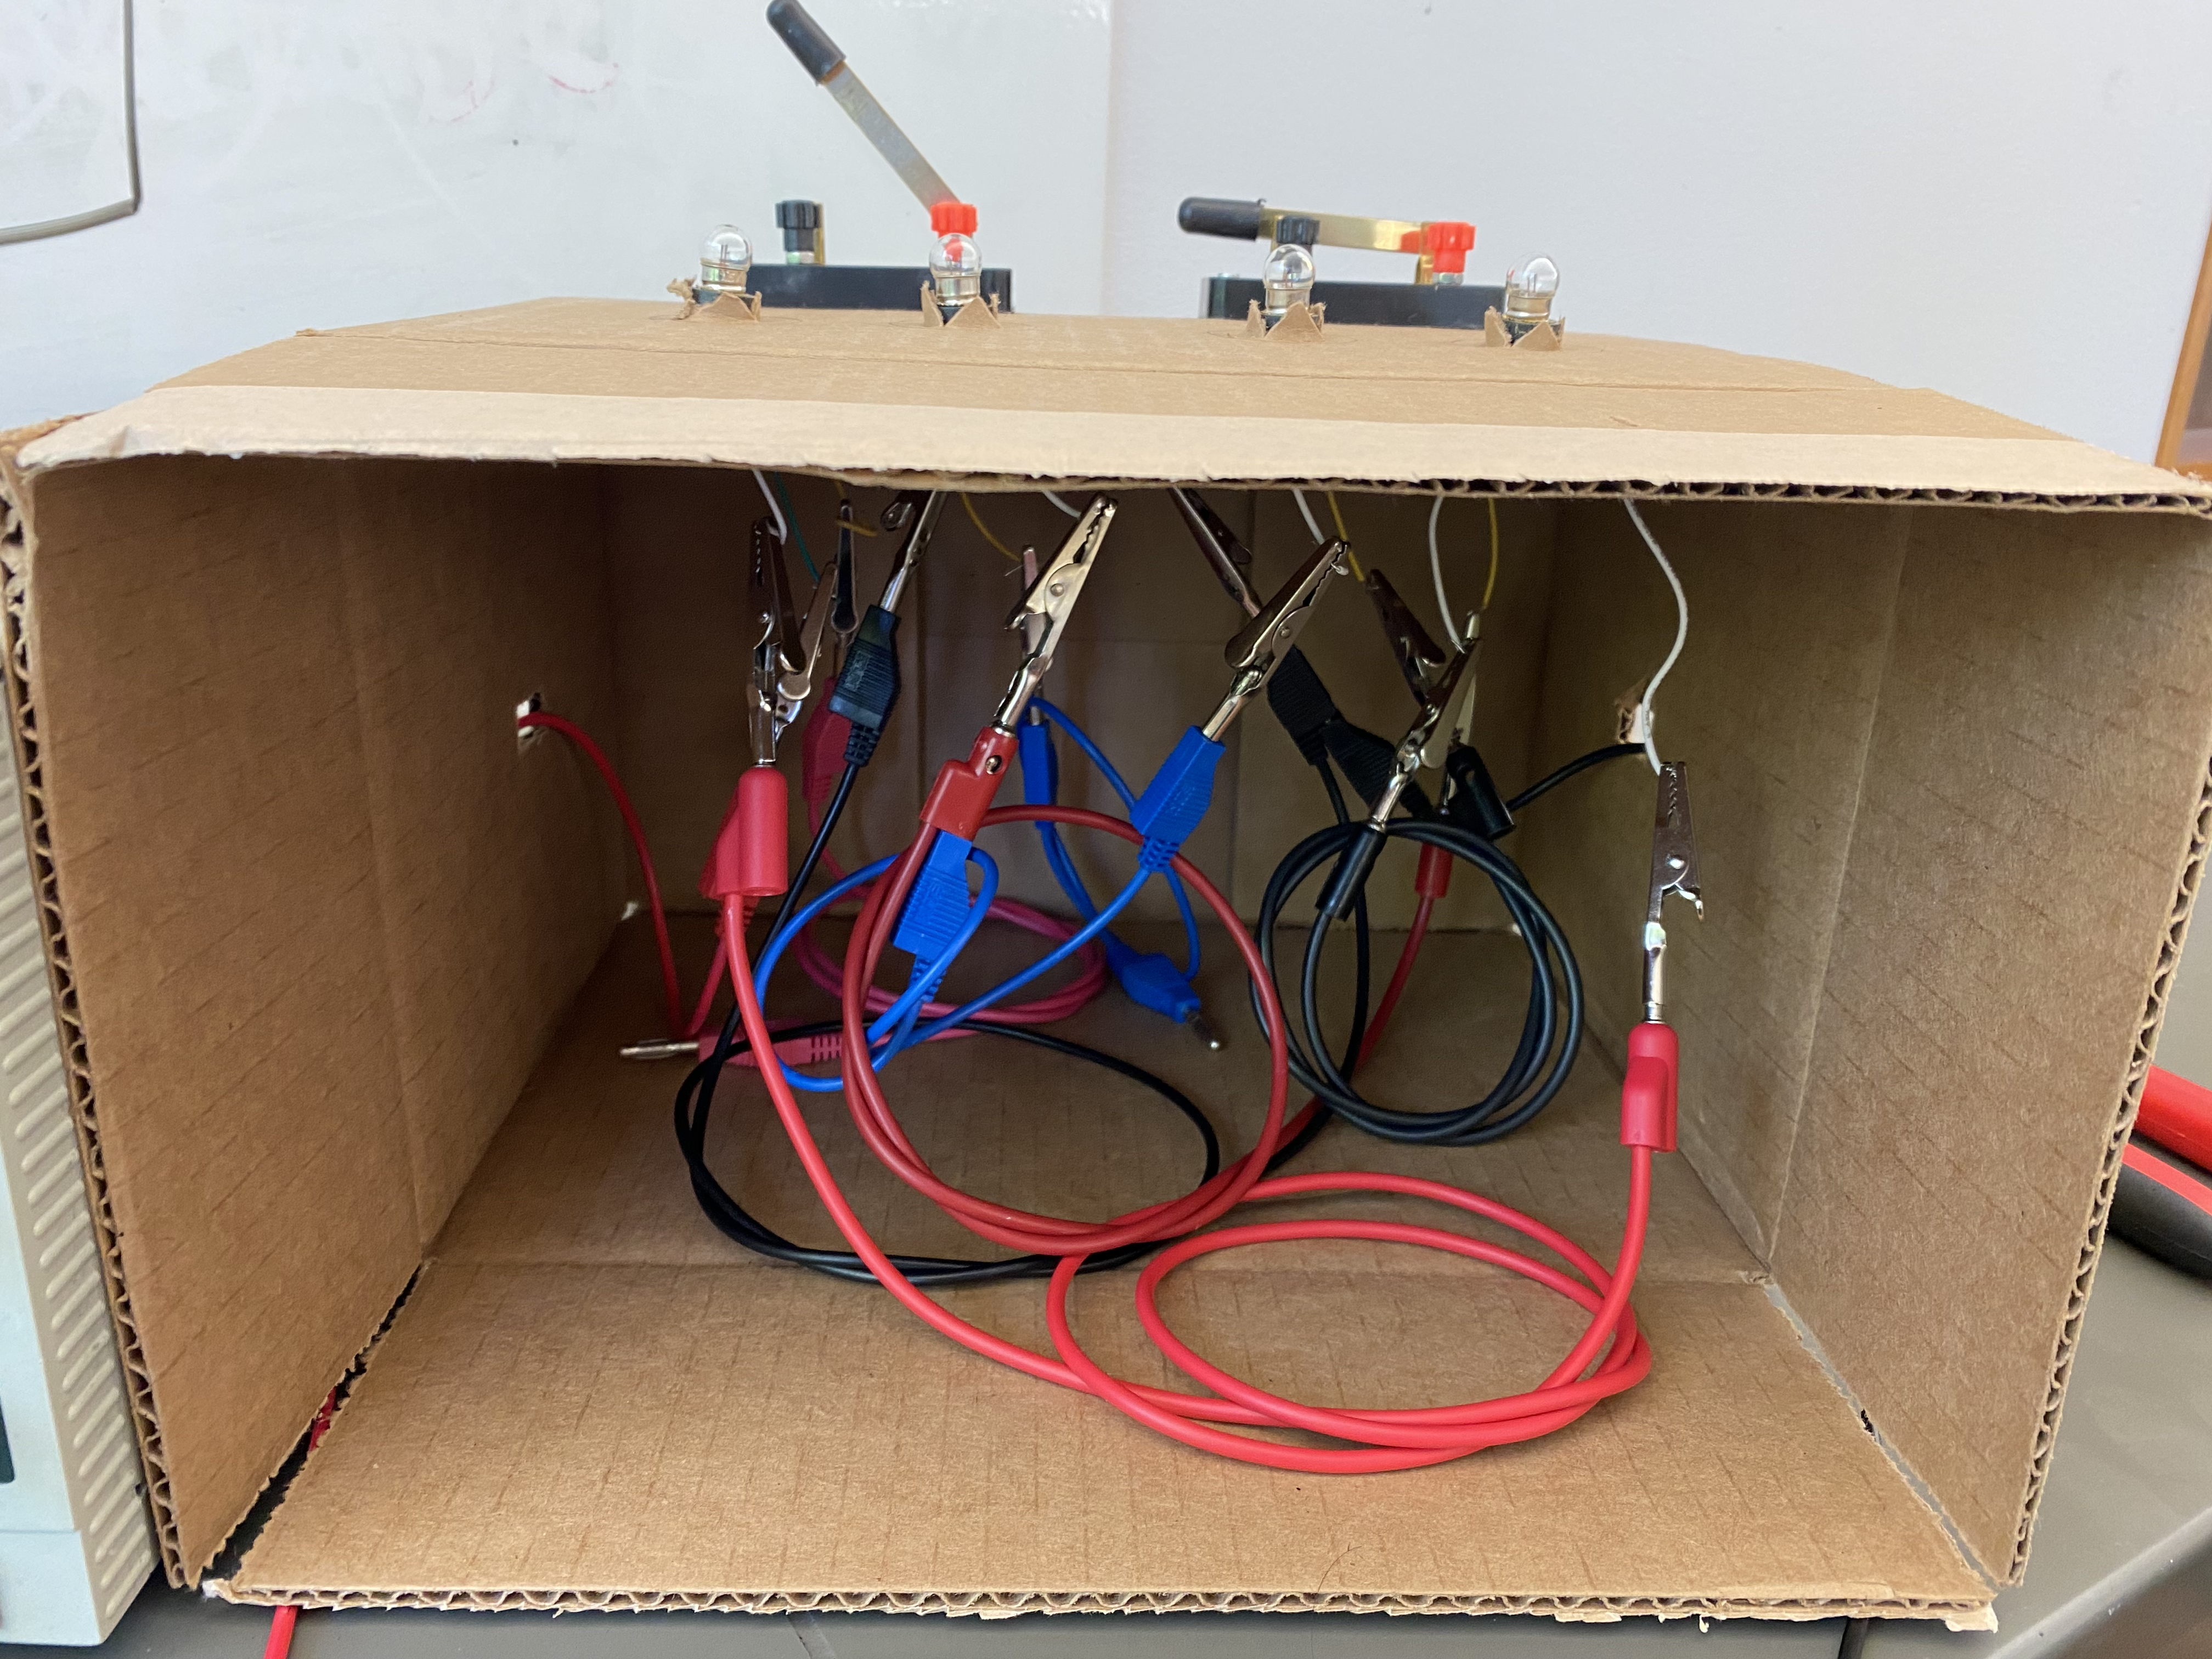
When I saw the pictures on Kelly’s blog, the boxes looked simple to construct. Then I started building and discovered so many construction challenges. The alligator clips I have didn’t stay in place, connections were shorting out, and states were difficult to reproduce.
If you’d like to build your own, here’s advice based on my mistakes:
- I recommend insulating your alligator clips to prevent shorts. I didn’t have any, which made my boxes finicky. Jostling the box risked shorting a connection.
- Use a larger box so there’s room for the wires. Mine are about 12″x7″x7″. If I’d used insulated clips, I could’ve gone smaller.
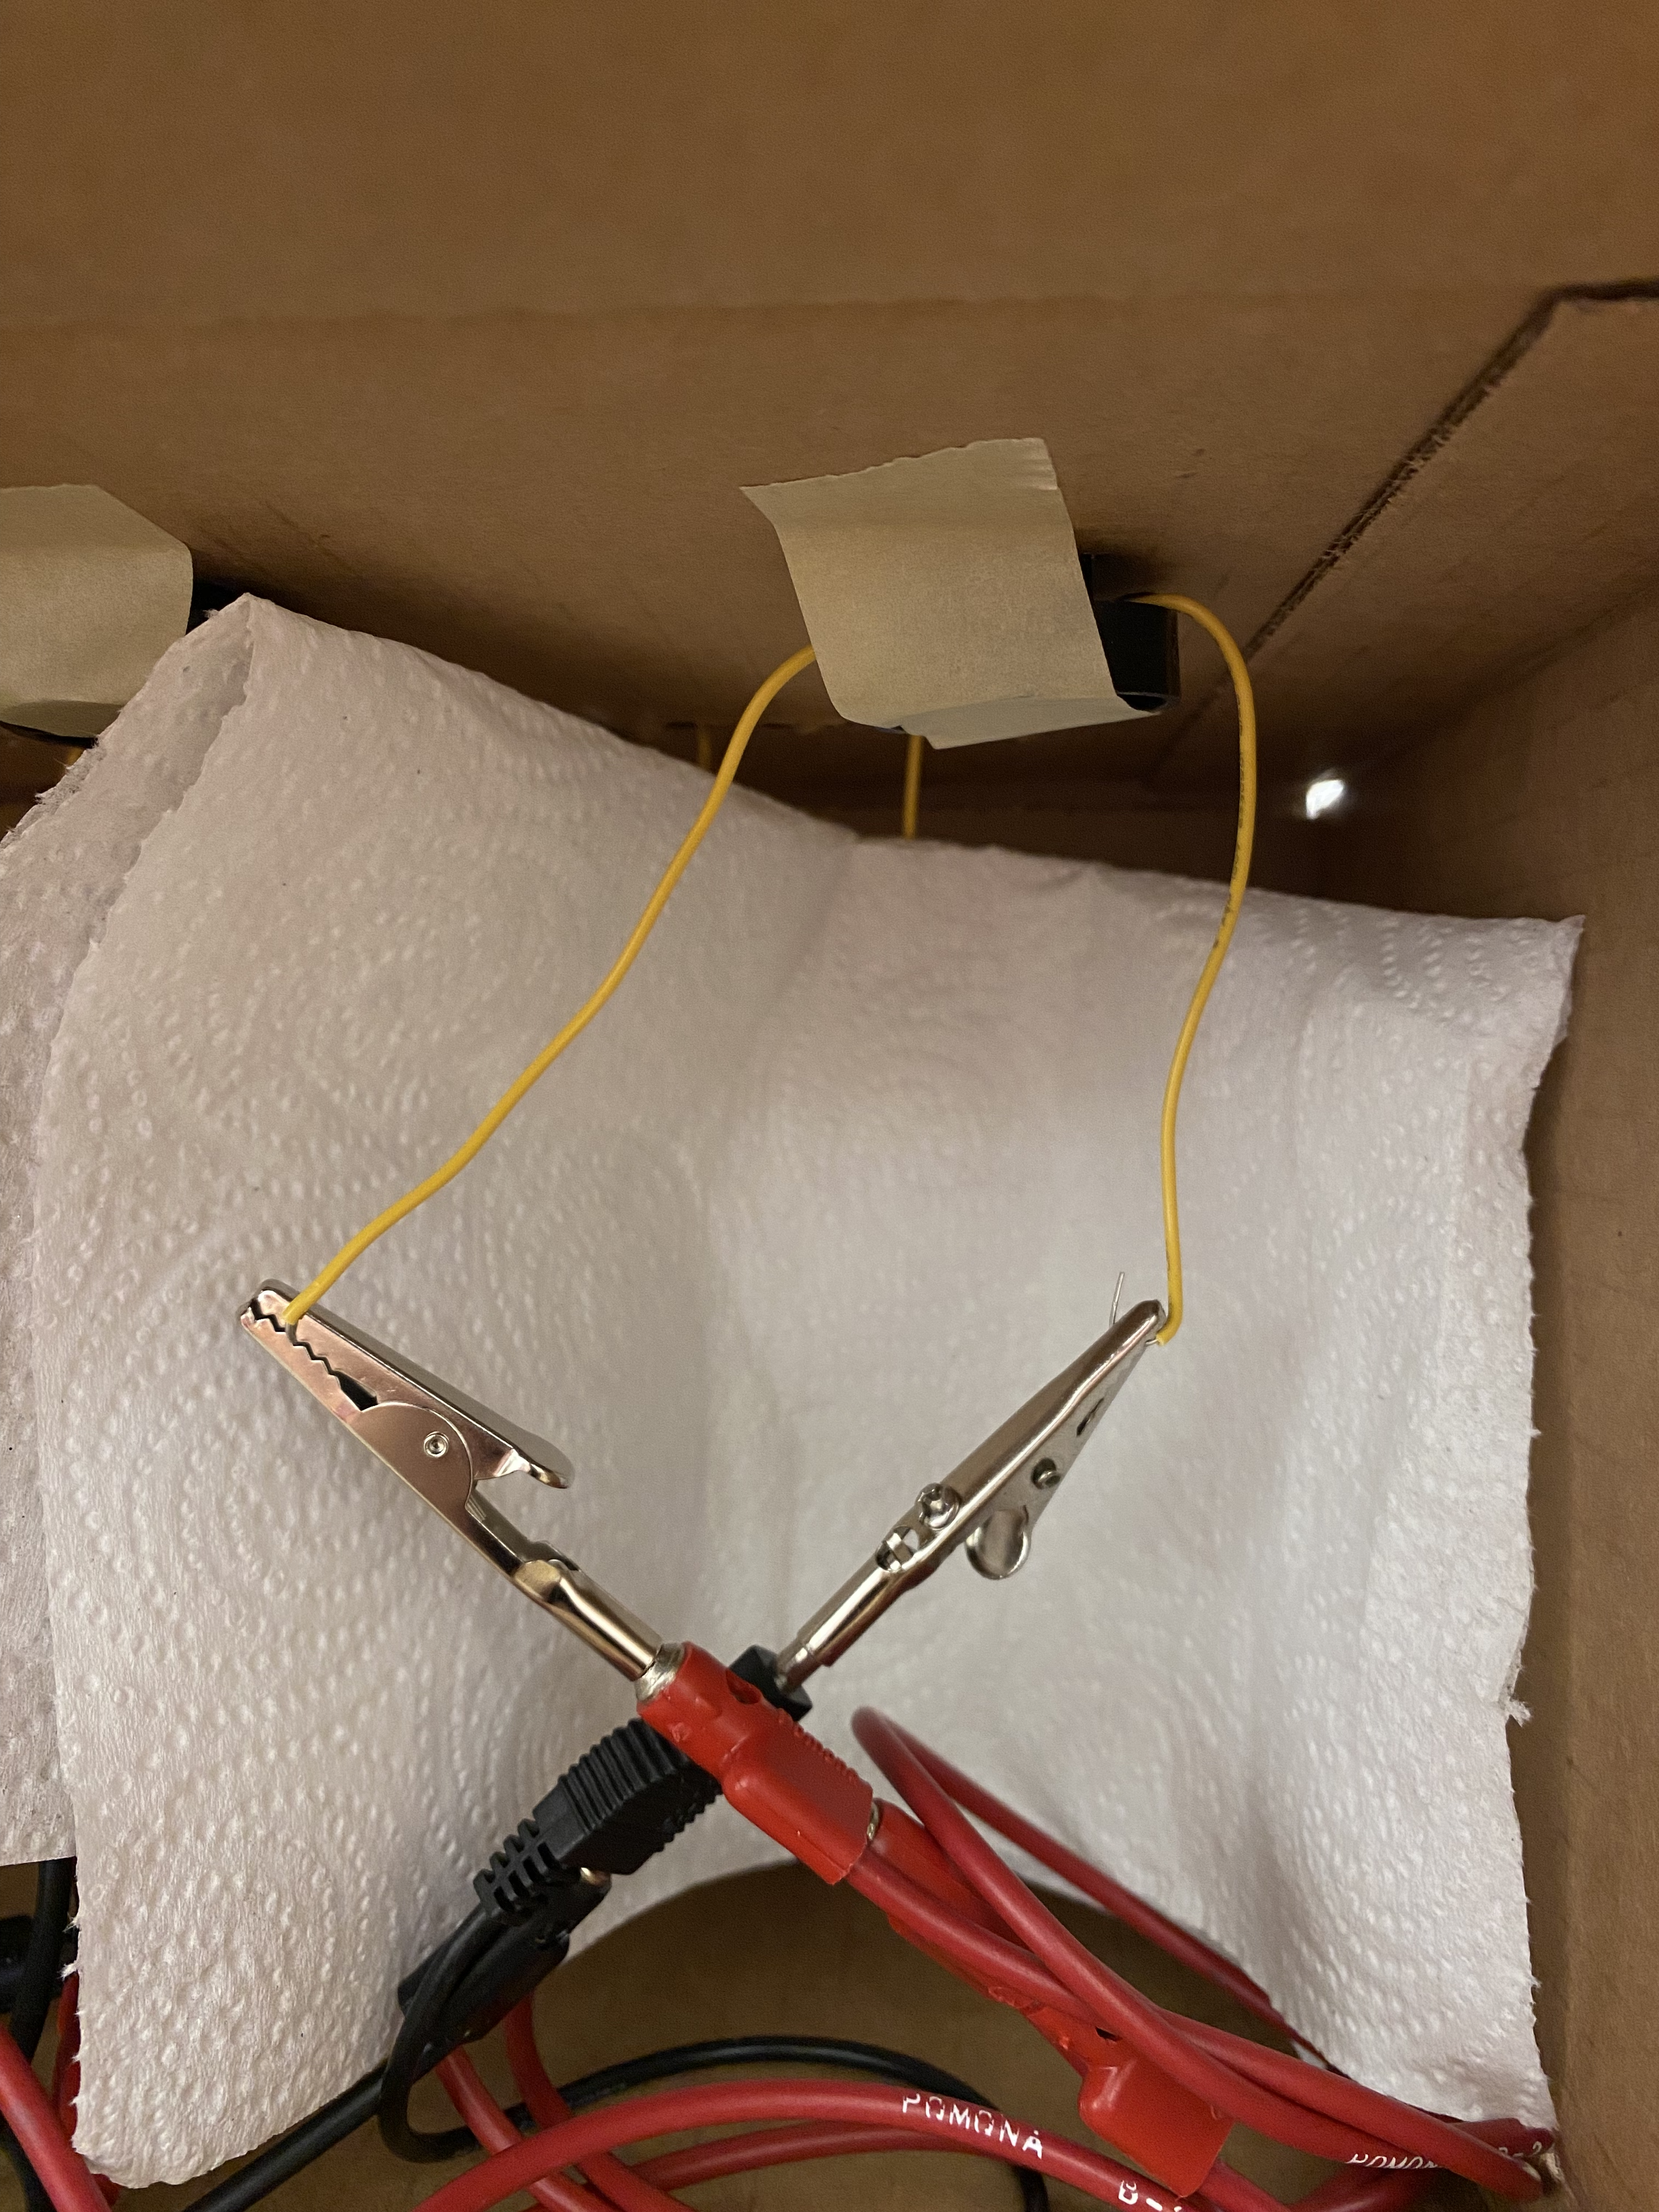
- Since it’s nearly impossible to reach the bulb holder’s screw terminals when mounted in the box, I attached a short length (about 3″ worked best) of solid core wire to the screw terminal. This extension wire gave me a more convenient spot to apply an alligator clip (see below right).
- Use 3.7V bulbs, like these. I regret the 1.5V bulbs I got off of Amazon because they kept blowing out.
- Attach switches and bulbs to the box. These boxes need to withstand multiple student interactions. I found that the 1/2″ socket head screws from Tetrix held my switches in place nicely.
- Labeling the switches and bulbs will make checking student work easier.
- Put a note on the box for students to call you over if a bulb never lights. During the practical, I had one student who burnt out a bulb halfway through her observations, giving her inconsistent data.
- Out of an abundance of anti-cheating caution, I built 3 boxes but rewired them so the behavior looked different at a glance.
- For the big reveal on the last day, open the box and show them the circuit diagram you’ve drawn on the inside flap of the box.
- Give your students practice with this type of problem before the lab practical comes around. I assigned Crack the Circuit from Universe and More in the nights leading up.
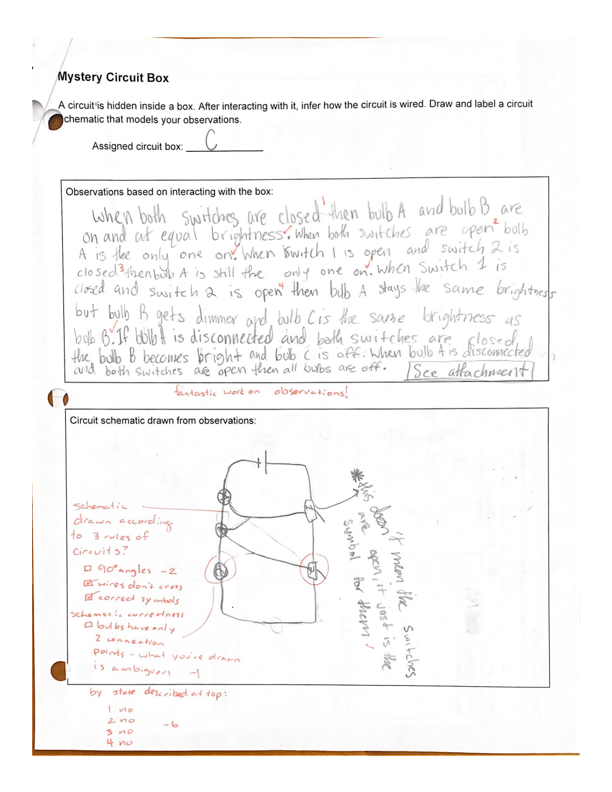
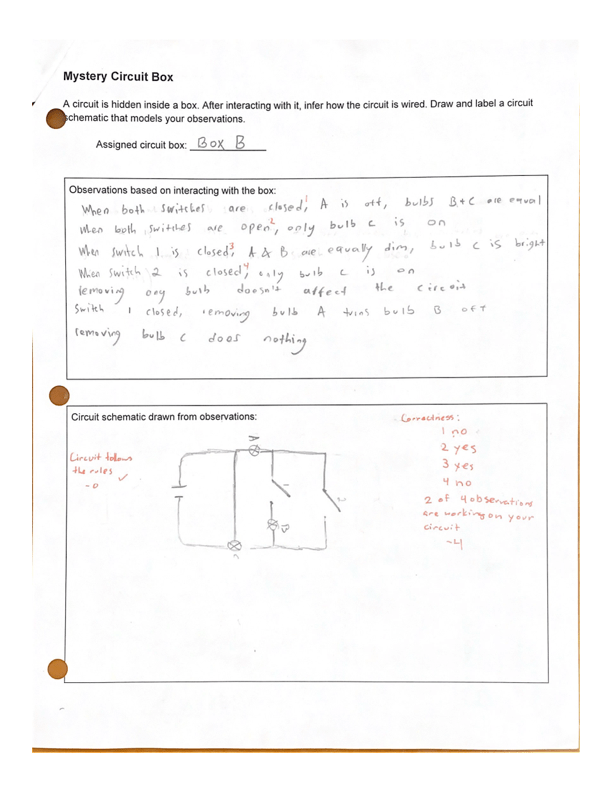
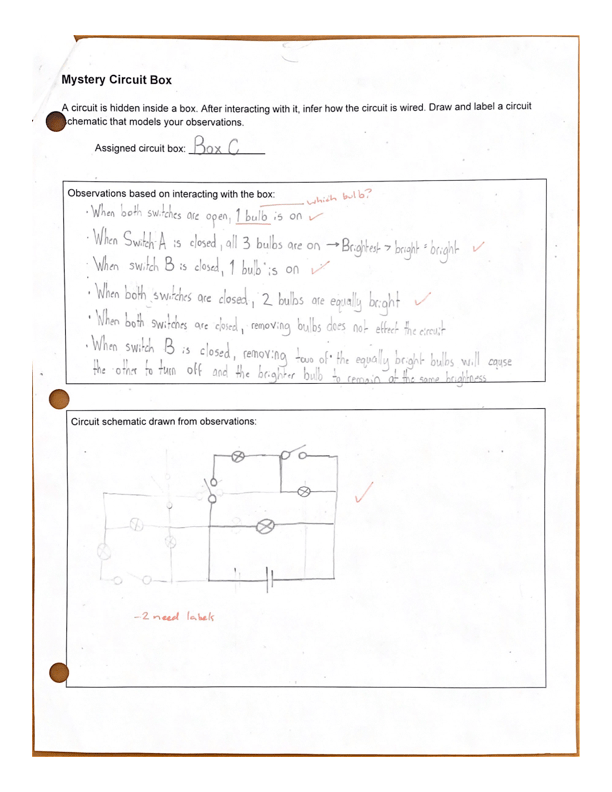
Mystery Box Student Work
In the interest of Design Principle #5, Easy to Grade, I wrote a rubric into the front page of the practical handout.

Below I’ve included four student work examples. All four have a complete set of observations. They vary in how well the circuit schematic implemented what was observed.

Forces Due to Charges in a Plane
aka, Guiding Students Who Don’t Know
For most students, there will come a time when they won’t know what to do when they don’t know what to do. Ideally, I want to hear something like, “I don’t know how to solve for all these variables, but in terms of variable x only, here’s my solution.”
This problem played out non-ideally on the Coulomb’s Law section. Students were given two charges, q and Q with a knowable distance between them. They were to then rank eight different scenarios by magnitude of electrostatic force. We’d practiced and quizzed on problems where only distance or charge varied, never both. To honor Design Principle #2, Building on Lab Experience, I figured many would be able to handle the shift to two variables. I was wrong.
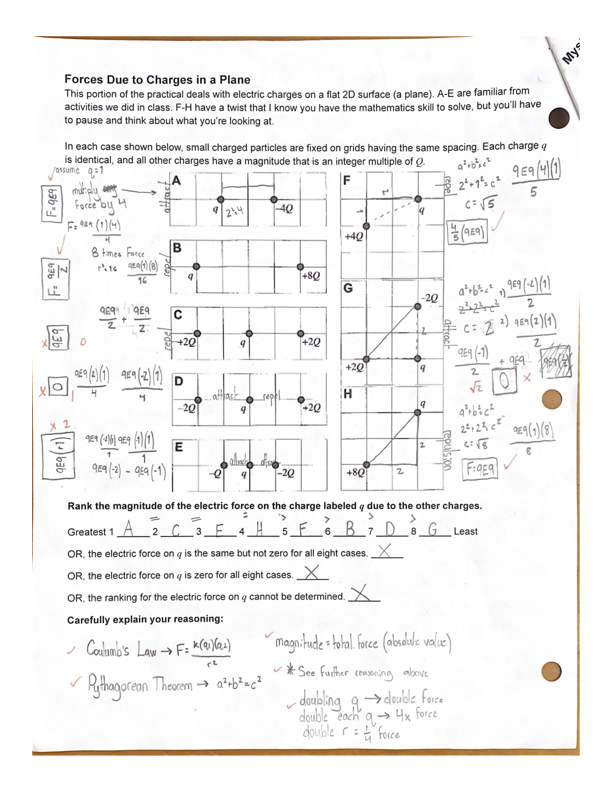
This student understood proportional reasoning, even with two variables. For G, they didn’t know what to do because we didn’t do any vector resolution work this year. 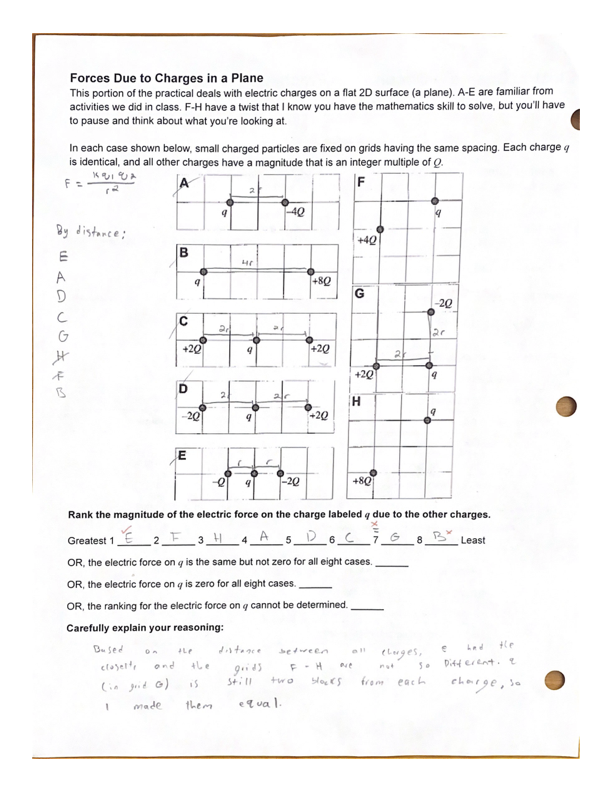
This student struggled with the two variable problem, so they ranked by increasing distance only. Good partial solution. 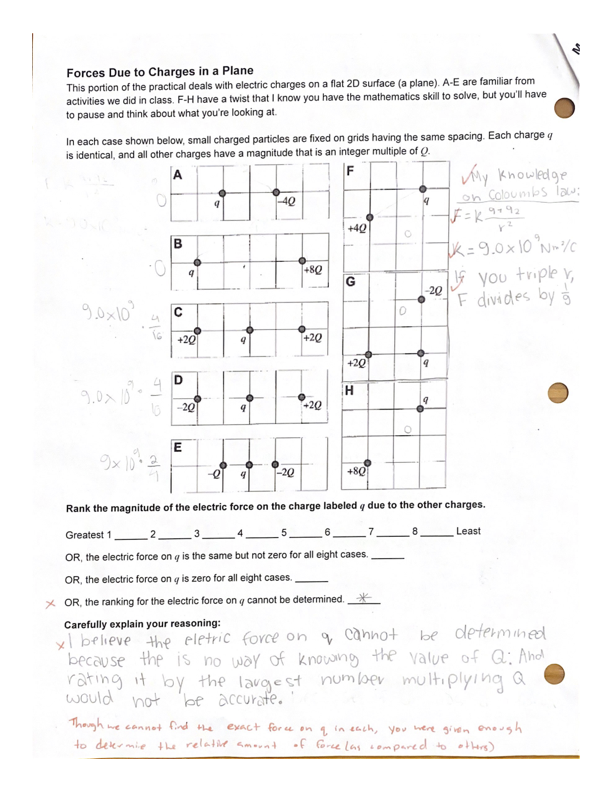
This student agonized over the problem for days and only wrote the Coulomb’s Law stuff at top right down at my insistence. The interactions we had were unsatisfying for both parties, so for students like them, I want to do better at facilitating the practical next year.
For the last example above, where the student agonized and felt frustrated by the problem, next year me might start with a simpler question and end with a challenging question like the one above.
Conclusions
While it was a little longer than anticipated, the Charge & Circuits Practical ticked all my Design Principles boxes. Several students enjoyed building circuits (the one part I didn’t discuss here because it was straightforward) and a even more would say they had a love/hate relationship with the Mystery Box.
If you’ve stuck with me this far, the biggest takeaway I hope you’ve gotten is to establish Design Principles that you can later evaluate success against. Using my own Design Principles, I quickly rejected any number of “fun” projects. Building a mousetrap car or Rube Goldberg machine assess skills not developed during the term, is a time sink when students have the least time to sink, and is incredibly to difficult to grade objectively.
What Design Principles have I missed?
